


1.How to report your problem to VStarcam Support Team?

If you are having problems with VStarcam device, please try the following ways to reach us:
- Mobile APP
- Mail to support@vstarcam.com
2.What languages does the APP support?
Currently, APP Eye4 supports the following 20 languages:
Simplified Chinese, Traditional (distinguish Hong Kong and Taiwan), English, German, French, Russian, Korean, Japanese, Italian, Spanish, Dutch, Vietnamese, Portuguese, Thai, Polish,Turkish,Arabic,Romanian,Indonesian,Greek.
3.Does VStarcam product support 5GHz WiFi?
Most products are configured to support 2.4 GHz Wi-Fi network mode; however, we are developing more and more products that support 5 GHz. Currently, only the 4.0 megapixels camera C22Q support 2.4/5 GHz Wi-Fi network mode; All other security cameras support only 2.4 GHz Wi-Fi network mode.
4.How to add device?
Please follow the steps below:
1.Download the mobile APP Eye4 to your smart phone. Eye4 APP is available in Google Play and APP store.
2. Register an account, take down the account name and password, for future login.
3. Login the Eye4 APP account which you have registered.
4) Indoor cameras:
- Power on the camera, wait until the camera boot up(it takes about 20 seconds).
- Press the “+” sign on the top right corner to begin the process of adding your device.
- From the device sticker located on the back/bottom of the camera, scan the QR code or manually input the UID number&password of the device.
- Follow the wizard to add your device to your Eye4 account.
- Power on the camera, connect the camera to the router’s LAN port with a network cable, wait until the camera boot up(it takes about 20 seconds)
- Press the “+” sign on the top right corner to begin the process of adding your device.
- From the device sticker located on the back/bottom of the camera, scan the QR code or manually input the UID number&password of the device.
- Follow the wizard to add your device to your Eye4 account.
5.What should i do if the camera shown offline?
The issue of ‘offline’ may caused by various factors, however, in most of cases, it is caused by network problems. Please refer to the steps below to do troubleshooting:
Step 1. Internet connection
1) Network connection in LAN
Please check whether you can view the real-time video when in the LAN. If you can, that means the the network connection in LAN is fine. If you can’t, then please check if the camera has been connected to your home network.
If the camera is wired connected, please check if the two LEDs on the ethernet port are on. Please make sure the cable has been plugged firmly and the camera can be detected in LAN.
If the camera is wirelessly connected, then please wired the camera to the router, check if it still shown offline.
2) Check the Internet connection
If the LAN connection is fine, then please check if you can surf the internet when connected to the home WiFi and mobile data. Please check this in multiple APP client, such as PC client.
If you can surf the internet when connected to the router’s WiFi and the mobile data, that means the internet connection is ok.
Step 2. Upgrade the firmware and the APP to the latest version
At this time, if the camera remains offline, please follow the steps below:
1) Check the camera’s firmware, and upgrade it to the latest version if it’s not the latest one;
2) Check APP version, if the version of the APP is not the latest, please uninstall it and download the latest one. Official download link: https://www.vstarcam.com/software-download,you can also download the app from google play and apple store.
Step 3. Change a network to test
If the above steps do not work, then please take the camera to other network to test. If it works good in other network, then this problem must be on the PNP penetration. Please contact our support team.
6.Can connect and view in LAN, but can not in WAN
The cause of the problem:
Generally speaking, the cause is that camera can not access the Internet, please check whether the wireless router which the camera connected to is working properly. Make sure that you can access the internet when connected to the WiFi router.
Suggestions:
If the router is working fine, then please check the following information:
1.Check LAN connection. If you can view the camera in PC client, mobile APP and web client, that means the LAN connection is fine. If you can’t view the camera in LAN, then we can’t view it in WAN.
2.If the camera can be viewed in LAN, please switch to mobile network, check whether the camera can be viewed normally.
3.If the camera cannot be viewed in mobile network, then please change a router to test again.
4.If the camera still can’t go online remotely after changing router, then it must be a problem of the camera’s PNP penetration. It is recommended that take the camera to other network environment to have a try, for example, your friend’s network.
5. If you can view the camera normally in other network environment, that means there is a problem with the local penetration of the camera. Then we can not use the UID to access. In this case, please contact the dealer for help.
Note:
1.Please make sure the camera get the latest firmware and the APP is the latest one. If not, please update the firmware and APP to the latest version.
2.Generally speaking, the issue that the camera can be connected and viewed in LAN, but can not in WAN is cause by software or server, instead of hardware problem, no need to return to factory for repair.
7.How does the cloud storage service work?
1.How does cloud storage work
After the cloud storage function is enabled, it will record videos when the camera detects movement and upload videos to the cloud server through internet connection. Note: It will not record video all the time after the cloud storage service is opened, only when the motion is detected. Besides, it does not capture images.
The cloud storage service is purchased for a single camera, if there are multiple cameras and all need to open the cloud storage service, then each camera needs to buy the cloud storage service separately.
If the camera is lost or stolen, and it is offline, if you want to see the video recorded in the cloud storage, do not delete the camera from the APP account, open the “cloud storage” in the APP and you can still watch it.
2. How to open cloud storage?
To open the cloud storage service for the camera, please launch the mobile phone APP, find the camera→click the three dots in the upper right corner of the camera→enter the cloud storage option→click “activate”. If it’s the first time for the device to open cloud storage service, you can get a cheap three-month trial of the service.
If you have enjoyed the cheap trial of cloud storage for three months, you need to purchase a package to continue using the cloud storage service. Please refer to the pricing on the APP for relevant packages and prices.
3. How to view video in cloud storage?
To view the cloud storage video, please enter the mobile APP, find the camera, click on the three dots in the top right corner of the camera, tap “cloud storage” option, you will get the cloud storage video page. Please click the date logo on the lower left side of the page, select a date, and then look at the time axis at the bottom of the screen, blue parts means there are videos, gray parts means there are no videos, click on the blue part to watch the video, drag the timeline to watch the video of other time period.
4. Why there is no video being recorded after you opened cloud storage service?
The causes of this problem may include:
1) No motion event is detected by the camera. If no movement is detected within the scope of camera monitoring, video will not be recorded or uploaded to the cloud server, so there is no cloud storage for video.
2) Poor Internet connection. The cloud storage video relies on the internet connection to upload to the cloud server. Poor internet connection may lead to the failure or loss of videos.
3)Movement is not obvious enough to be detected by the camera. If the motion movement detected by the camera is too short or the recorded video is too small, the camera will not record cloud video or can’t be displayed even if the video is successfully uploaded to the server.
4)The device is offline. If the device is restarting or power is being cut off, the device will be offline during this period, and there will be no cloud storage video being recorded.
5) Cloud server problem. If all the above causes are excluded, the issue may be caused by the cloud server. Please contact support for help. To contact support, please refer to the FAQ How to report your problem to VStarcam Support Team?
8.Areas that the cloud storage service opened(In continuous update)
Currently, areas that opened cloud storage service:
| Region | Countries |
| Asia | China, Vietnam, Laos, Cambodia, Myanmar, Thailand, Malaysia, Singapore, Indonesia, Philippines,Brunei, East timor, Japan, Russia, India, Nepal, Bhutan, Bangladesh, Pakistan, Sri Lanka, Saudi Arabia, United Arab Emirates, Qatar, Oman, Kuwait, IraqIran, Yemen, Syria, Jordan, Lebanon, Kazakhstan, Georgia, Uzbekistan, Kyrgyzstan, Tajikistan, Turkmenistan, Mongolia, Afghanistan, Turkey, Georgia, Azerbaijan, Armenia, Kazakhstan, Israel |
| The Americas | The United States, Canada, Colombia, Venezuela, Guyana, Suriname, Ecuador, Peru, Brazil,Bolivia, Chile, Paraguay, Uruguay, Argentina, Mexico, Cuba, Panama, Costa Rica, Nicaragua, Honduras、El Salvador, Guatemala, Belize, Jamaica, Haiti, The Dominican Republic, Trinidad and Tobago, Trinidad and Tobago |
| The European | Britain, Ireland, Netherlands, Belgium, Luxembourg, France, Monaco, Germany, Austria, Switzerland, Liechtenstein, Poland、Czech republic, Slovakia, Hungary, Ukraine, Estonia, Latvia, Lithuania, Moldova, Iceland, Denmark,Norway, Sweden, Finland, Portugal, Spain, Andorra, Italy, Vatican, SAN Marino, Malta, Serbia, Croatia, Slovenia, Bosnia, Herzegovina, Montenegro, Macedonia、Kosovo, Albania, Romania, Bulgaria, Greece, Belarus |
| Oceania | Australia, New Zealand, Papua New Guinea, Vanuatu, Solomon islands, Vanuatu |
9.Cloud storage service price-20181207
Current promotions
China region
The third parties payments (Alipay, WeChat pay)
App Store Price(Repeal, has enabled third-party payment)
North American region
Area: United States, Canada, Mexico, Cuba
Southeast Asia region
Area:Vietnam, Laosr, Cambodia, Myanmar, Thailand, Malaysia, Singapore, Indonesia, Philippines, Brunei, East timor
Japan region
Area: Japan
Korea region
Area: Korea
European region
Area: Britain, Ireland, the Netherlands, Belgium, Luxembourg, Germany, France, Monaco, Austria, Switzerland, Liechtenstein, Poland, Czech Republic, Slovakia, Hungary, Ukraine, Iceland, Denmark, Norway, Sweden, Finland, Portugal, Spain, Andorra, Italy, Vatican, San Marino, Malta, Serbia, Croatia, Slovenia, Bosnia, Herzegovina, Montenegro, Macedonia, Kosovo, Albania, Romania, Bulgaria, Greece, Turkey, Georgia, Kazakhstan, Israel.
Russia region
Area: Russia, Ukraine, Estonia, Latvia, Lithuania, Moldova, Azerbaijan, Armenia, Belarus, Kazakhstan, Georgia, Uzbekistan, Kyrgyzstan, Tajikistan, Turkmenistan, Mongolia
India region
Area:India, Nepal, Bhutan, Bangladesh, Pakistan, Sri Lanka, Afghanistan
South American region
Area:Colombia, Venezuela, Guyana, Suriname, Ecuador, Peru, Brazil, Bolivia, Chile, Paraguay, Uruguay, Argentina, Panama, Costa Rica, Nicaragua, Honduras, El Salvador, Guatemala, Belize, Jamaica, Haiti, Dominican Republic
Dubai Region
Area:Saudi Arabia, UAE, Qatar, Oman, Kuwait, Iraq, Iran, Yemen, Syria, Jordan, Lebanon
Oceania Region
Area:Australia, New Zealand, Papua New Guinea
| Region | Promotions |
| China (including Hong Kong, Macao and Taiwan) | Free trial for 3 months (7 days for cycle storage), one chance for each device, only for devices in mainland China. |
| Outside China | $0.99 for a 3-month trial (7-day cycle storage), one opportunity for each device. |
| Period(Months) | Cycle(Days) | Price(¥) |
| 12 | 30 | 199 |
| 6 | 30 | 118 |
| 3 | 30 | 59.7 |
| 1 | 30 | 19.9 |
| 12 | 7 | 99 |
| 6 | 7 | 58 |
| 3 | 7 | 29.7 |
| 1 | 7 | 9.9 |
| Period(Months) | Cycle(Days) | Price(¥) |
| 12 | 30 | 193 |
| 6 | 30 | 118 |
| 3 | 30 | 60 |
| 1 | 30 | 25 |
| 12 | 7 | 98 |
| 6 | 7 | 60 |
| 3 | 7 | 30 |
| 1 | 7 | 12 |
| Period(Months) | Cycle(Days) | Price: USD |
| 12 | 30 | 129.99 |
| 1 | 30 | 12.99 |
| 12 | 7 | 49.99 |
| 1 | 7 | 4.99 |
| Period(Months) | Cycle(Days) | Price: USD |
| 12 | 30 | 38.99 |
| 1 | 30 | 3.99 |
| 12 | 7 | 18.99 |
| 1 | 7 | 1.99 |
| Period(Months) | Cycle(Days) | Price: USD |
| 12 | 30 | 129.99 |
| 1 | 30 | 12.99 |
| 12 | 7 | 49.99 |
| 1 | 7 | 4.99 |
| Period(Months) | Cycle(Days) | Price: USD |
| 12 | 30 | 129.99 |
| 1 | 30 | 12.99 |
| 12 | 7 | 49.99 |
| 1 | 7 | 4.99 |
| Period(Months) | Cycle(Days) | Price: USD |
| 12 | 30 | 129.99 |
| 1 | 30 | 12.99 |
| 12 | 7 | 49.99 |
| 1 | 7 | 4.99 |
| Period(Months) | Cycle(Days) | Price: USD |
| 12 | 30 | 129.99 |
| 1 | 30 | 12.99 |
| 12 | 7 | 49.99 |
| 1 | 7 | 4.99 |
| Period(Months) | Cycle(Days) | Price: USD |
| 12 | 30 | 38.99 |
| 1 | 30 | 3.99 |
| 12 | 7 | 18.99 |
| 1 | 7 | 1.99 |
| Period(Months) | Cycle(Days) | Price: USD |
| 12 | 30 | 38.99 |
| 1 | 30 | 3.99 |
| 12 | 7 | 18.99 |
| 1 | 7 | 1.99 |
| Period(Months) | Cycle(Days) | Price: USD |
| 12 | 30 | 169.99 |
| 1 | 30 | 16.99 |
| 12 | 7 | 69.99 |
| 1 | 7 | 6.99 |
| Period(Months) | Cycle(Days) | Price: USD |
| 12 | 30 | 129.99 |
| 1 | 30 | 12.99 |
| 12 | 7 | 49.99 |
| 1 | 7 | 4.99 |
10.How to purchase cloud service?
After the mobile APP is upgraded to 5.3.0 and above, the purchase mechanism of cloud storage service will be changed into ticket format, then how to purchase cloud storage service? Please follow the steps below:
Step 1: Top up the ticket
After the camera is added to the APP, open the phone APP, click on the three points in the top right corner of the camera → “Cloud Storage”, click the renewal icon in the upper right corner of the page→”Renewal”, select the relevant packages(tickets needed for each package will be displayed on the right side of the package), click “Buy now” , choose the ticket package you prefer, click ‘top-up ticket ‘ on the lower right corner of the page, choose the ticket package and purchase.
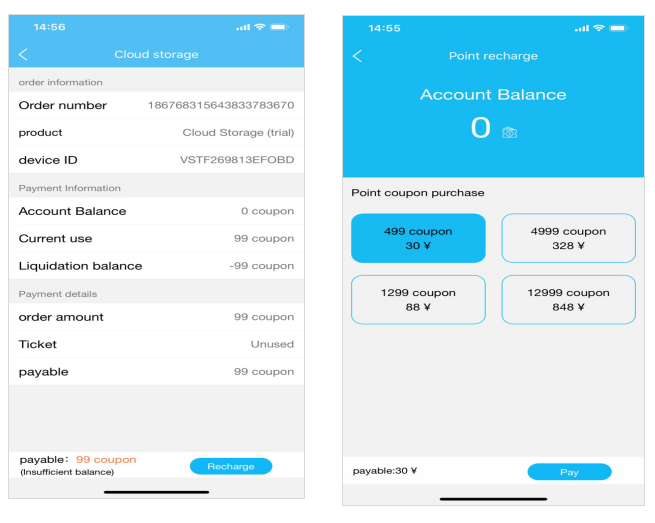 Step 2: Purchase cloud storage service package
After successful top up the tickets, the APP will jump back to the renewal page. Click the “Renewal” button and choose a package you prefer and pay for it. After successfully paid for it, the cloud service will be activated and the camera will record video when it detect motion and upload the videos to the server.
Step 2: Purchase cloud storage service package
After successful top up the tickets, the APP will jump back to the renewal page. Click the “Renewal” button and choose a package you prefer and pay for it. After successfully paid for it, the cloud service will be activated and the camera will record video when it detect motion and upload the videos to the server.
11.How to download cloud storage video clips?
To download video clips in cloud storage, please upgrade the mobile APP to the latest version first, and then follow the steps below:
On the home page of the mobile APP, click on the three dots in the upper right corner of the camera and select the “Cloud storage” option.
Vertical cloud storage interface
Click the video file you want to download and click the download arrow in the upper right corner of the screen to download. After downloading, video file will be stored in the phone album or the DCIM folder in the local files of the phone.
Horizontal cloud storage interface
Click the “Cloud storage” option and the page will automatically jump to the vertical cloud storage page. Click the blue switching icon in the upper right corner of the page and the page will switch to the horizontal cloud storage page. Click the download arrow in the upper right corner of the page, drag the download box in the timeline according to the prompt on the page, select the videos to download, click the √ in the upper right corner of the page to confirm the downloading. After downloading, video file will be stored in the phone album or the DCIM folder in the local files of the phone.
Note: To play the downloaded cloud storage videos on the computer, we need to transfer videos from the phone to the computer.
12.How to reset the VStarcam security camera?
Hold the reset button for 5-10 secs; For indoor cameras, wait for the voice prompt informing you that the device has been reset successfully. Outdoor cameras will not give you the voice prompt, but will issue one slight clicking sound after being reset successfully. Generally, reset takes about 1-2 mins.
13.Account login failed, appear “ unknown error”-Eye4 installation
Generally speaking, this kind of problem is related to the compatibility between the APP and the phone or computer. The solution are as follows:
1.APP for PC client: Please uninstall the APP(completely remove it from your computer’s local disk, desktop and control panel→program), then download and install it to a different location and then login APP again.
Note:Please don’t use the default installation path when download and install the eye4 software, choose a different disk to place it.
2.APP for Smart Phone: Please uninstall the APP, then download and install a new one. please check whether the APP is blocked by any security softwares, such as Security steward, 360 anti-virus software etc.
This problem can also be caused by the server, so if the above two methods don’t work, please wait for the sever to be repaired and try again later. Thanks!
14.Camera displayed offline after replaced the Router
After replaced the router, the camera will display offline. The reasons is that the camera saved the previous WiFi network information, can’t switch to new WiFi network automatically. We need to setup the new WiFi to the camera. The steps are as follows:
Step 1. To reset the camera to factory settings by referring to the reset guide.
Step 2. After that, please re-configure the camera’s wireless according to the new WiFi network.
Note: Before configure the camera to the new WiFi router, we need to reset the camera to factory default.
15.Camera reboot automatically from time to time
The problem of camera reboot automatically from time to time is generally caused by network or firmware problem, not caused by hardware.
The solutions are as follows:
Method 1. Network factors
Please check whether there is IP address conflict. Please download IP Camera Finder from the webpage (https://www.vstarcam.com/software-download), then open the Finder, to see if the IP address is the same with other cameras in camera list. If the IP address conflicted with other cameras, please modify the IP to a different static IP or change it to dynamic ip.
Method 2. Upgrade camera’s firmware to the latest version
If the above methods does not work, it probably caused by hardware problems, please contact the direct dealer for maintenance.
16.Camera time display incorrectly
If the time on the camera displayed incorrectly, firstly, please make sure the camera is not connected by users from other time zones.
Secondly, please download the latest version of mobile APP and upgrade the firmware of the camera to the latest version.
17.Can not get real-time video
If the camera is online and the functions of listen, speak, PTZ control all working good, but can’t display the real-time video, then it must be cause by hardware problems. The solutions are as follows:
1.Reset it to factory default settings, re-configure it and try again.
2.Upgrade the camera to latest firmware.
3.Run the camera in other client, such as PC client, mobile APP, Web client, if all operations failed, then it must be hardware problem.
If none of the above methods work, then please contact the dealer for replacement or maintenance.
18.How to open motion detection alarm?
We can open motion detection on mobile APP or PC client.
Mobile APP
Open motion detection alarm. In the homepage of the APP, click on the three dots on the top right corner of the camera, go to ‘Settings→Alarm’, tap to open the ‘Motion Detection Alarm’.
Choose notification type. There are two types to choose from: Client(APP notification) and mail notification. If you open the client notification, then when the camera detect motion, the motion alarm will be triggered and it will send an alarm message to your mobile APP.
If you open the mail notification, please enter your email address and activate it as instructed. After finished, when the camera detect motion, the motion alarm will be triggered and it will send an alarm message to your mailbox.
Set alarm time schedule. The camera will open motion detection alarm 24 hours 7 days by default once you enabled the motion detection alarm, if you want to set time schedule for the motion detection alarm, please click ‘Add schedule’, set start & end time and week time, save it, then the camera will only open motion detection during the scheduled time.
PC client
Open motion detection alarm. Open the client, right click the window of the camera, click ‘start’. Click the little gear icon on the bottom right of the camera’s window, click ‘Camera Parameters’, click ‘Get’, after the time zone display correct time, click ‘Alarm’ in the middle section of the window, tick the ‘Enable motion detect’. You can also set motion detection sensitivity(The smaller the number, the more sensitive).
Set details of alarm. Click ‘Alarming’ , tick ‘Enable Alarm’, click ‘Add’ and the ‘Add alarm schedule’ window will pop up. Choose the week days, start and end time of the motion detection alarm.
Set alarm duration(seconds) . Under the ‘Trigger’ section, tick the ‘Motion detection’.
Under the ‘Action’ section, you can choose motion detection action. There are 4 actions can be set: Sound, video record, picture, preset position( the ‘application’ action was canceled). Among which, the sound and preset position require the camera have the function of sound and preset. After all settings are finished, click ‘OK’ and the motion detection alarm will be functional.
19.How to Set Email Alarm on Mobile Phone APP?
After added the camera to the APP on mobile phone, if you want to get email alarm, please refer to the steps below:
Step 1. Find the Alarm option.
Open the APP, in the homepage of the APP, tap the three dots on the right corner of your camera, go to ‘ Settings’→Alarm→Notification Type.
Step 2. Add mail address.
Go to ‘Mail notification’ and put in your email address, press ok.
Step 3. Verify the mail.
Please login your mailbox and you will find the verification mail with a link. Click on the link to verify the mailbox. It will show successful verification.
Step 4. Email Alarm.
After that, you will see that it shows the mailbox has been verified. When there is alarm triggered, you will get alarm mail(without snapshot).
20.What should user do if can't receive motion alarm notification in app?
1) Ensure the phone signal is good and internet connection is ok.
2) Ensure that this feature has been enabled in the Eye4 app.
3) Ensure the Eye4 app is running in front or background of the phone.
4) Ensure the Eye4 app is not blocked from sending notifications by any anti-virus installed on your mobile phone.
5) Ensure notification for Eye4 app has been enabled in phone setting.
21.Can not receive alarm notification
There are two kinds of alarm modes:
Motion detection alarm: common IP cameras;
Linkable alarm: linkable alarm cameras with door sensor etc.
The solutions to this issue are as follows:
Enable motion detection alarm:
Open the App, choose your camera, click on the on the right corner of the cameraSettingsAlarm, make sure the ‘ Motion detection alarm’ has been turned on.2. The alarm of linkable alarm cameras is enabled by default, what you need to do is to choose ‘Notification type’.
If you want to get alarm message on the app, please enable the ‘client’.
Setting steps:
1. Open the App, choose your camera, click on the three dots on the right corner of the cameraSettingsAlarm, open the ‘client’.2. Choose Notification Mode: Generally speaking, there are two notifications modes can be choose, one is Client notification, the other is Email notification.
Motion detection alarm on alarm cameras: only need to set Notification Mode.
The alarm of Linkable alarm cameras is enabled by default, we can turn on/off the alarm.
Notes:
Enable notification push: please enable “Message Notification” of the eye4, ( this setting can be done directly in IOS devices, but on Android devices, we need to add the eye4 to the white list of the anti-virus).
Email Notification: Enter the Email address, save it and follow the guide to click the activate link to activate the mail, then you can receive alarm mail. If you don not get alarm mail, please check “ spam folder’, to see if the alarm mails are there.
3. Alarm record. Go to the“Message”center to see records of alarm.
Currently, it can record about 100 alarm messages. When it is full, the original alarm message will be covered.
Note:
Generally speaking, the issue that can not receive alarm notification is caused by software, instead of hardware. Please upgrade software to the latest one or wait for the server maintenance.
22.What to do if the camera always push motion detection alarm notification?
If the camera pushed too many motion detection alarm notification, you may lower the sensitivity of motion detection. Method: Click the three dots in the upper right corner of the camera on the home page of APP, select ‘Settings – Alarm’, and turn down the’ Motion detection sensitivity ‘.
If you do not want to receive alarm push, you can simply turn off the motion detection alarm or turn off both the client and email notifications in ‘Notification Type’.
Note: This setting works for all cameras under this account. If this function is turned off, push notifications for motion detection of all machines under this APP account will be turned off.
23.What to do if the motion detection alarm notification is limited?
If you find that the camera motion detection is no longer pushed, open the option of ” Settings-Alarm” in the mobile APP, and find that the APP prompts “The number of your motion detection alarm notifications has reached the limit, please click to view”, you can take the following measures to remove the limit:
1. Remove restrictions directly from mobile APP
Click the prompt “The number of your motion detection alarm notifications has reached the limit, please click to view”, and click “Release” at the bottom of the page, the alarm push will be recovered.
2. If method 1 does not work, please contact the manufacturer for technical support
If clicking “Release” on the mobile phone APP does not work, it may be caused by the network failure. You can log out of the APP account and log in again,power off and restart the camera.
If it still fails, you can provide the UID number of the camera to the support engineers through “Me-Online Support” and ask for help.
Note: The push limited is caused by too many pushes. Please lower the sensitivity in the motion detection settings to reduce unnecessary alarm push.
24.Forget the Camera Password
Please reset the camera to factory default settings, the default password of the camera is 888888.
How to reset:
Power on camera, then find out the camera “ reset “ hole, use a pin or pencil to keep pressing the button for about 15 seconds until camera reboot, then the camera will be reset successfully.
Notes:
1.Indoor camera’s reset button: at the back of the camera or in the lower section of the head of the camera ;
2.Outdoor camera’s reset button (without Pan &tilt): on the power cable.
25.Forget App Account and Password
1.Currently, there is no way to retrieve account name of PC and mobile APP, it required to register a new one if you forgot it.
2.If you forgot the password, click “ Forget Password “ in Eye4 APP in PC or Phone, enter the email account bound the account, then you will get a verification mail, please follow the system prompts to change the password.
Note: If you can not get the verification mail, please contact us.
26.Can SD card automatically start recording after inserted?Can it record when no internet connection?
1. At present, C series, D series, E series.
After inserted the SD card, the camera will automatically start loop recording, and will automatically overwrite the old recording files when full, do not need to do extra settings of recording.
If you want to cancel the recording, on the smartphone APP, please go to ‘Settings→TF Recording’, change the ‘Recording Mode’ to ‘No recording’. Or you can untick the ‘Record with 24hr’on the PC client.
If you want to set the recording time, please use the smartphone APP, PC client or Web client settings.
Smartphone APP
Please go to ‘Settings→TF Recording’ ,tap the ‘Add Schedule’ to set time schedule of recording.
PC client
Click the ‘Settings→Camera Parameters’, click the ‘get’ to obtain the camera’s parameters, then click on the ‘Record’ on the left of the ‘Camera Parameters’, tick the ‘record→scheduled recording’, choose ‘Add’, then you can set the time schedule of the recording.
2. Can it record when no network connection?
There are two cases:
Case 1. The camera has been connected to your router wiredly or wirelessly, but can not access the internet, in this case, the camera can record videos.
Case 2. The camera only plug in the power, not connected to your router wiredly or wirelessly, in this case, the camera will not record videos. {So, Only when the camera is connected to your home network, it can automatically start recording, otherwise it can not record to SD card automatically}
27.How long does the SD card record?
The following data is based on the test of video duration calculation of 64G TF card. The results will be different in different scenarios. For example, the space of recording for static and dynamic picture are not the same. If you set different parameters, the results may different. The data is calculated on the camera’s default stream settings, just for your reference.
1. It can record 16 days when C38 is in 720P mode.
2. It can record 18 days when C7815WIP is in 720P mode.
3. It can record 14 days when C37A is in 960P mode.
4. It can record 10 days when C50S is in 1080P mode.
5. It can record 8 days when C38S is in 1080P mode.
Note: You can choose high-bit stream or low stream image, they take different amount of capacity. You can setup the video stream in the IE web interface of the camera(Camera parameters-Video record-SD card record).
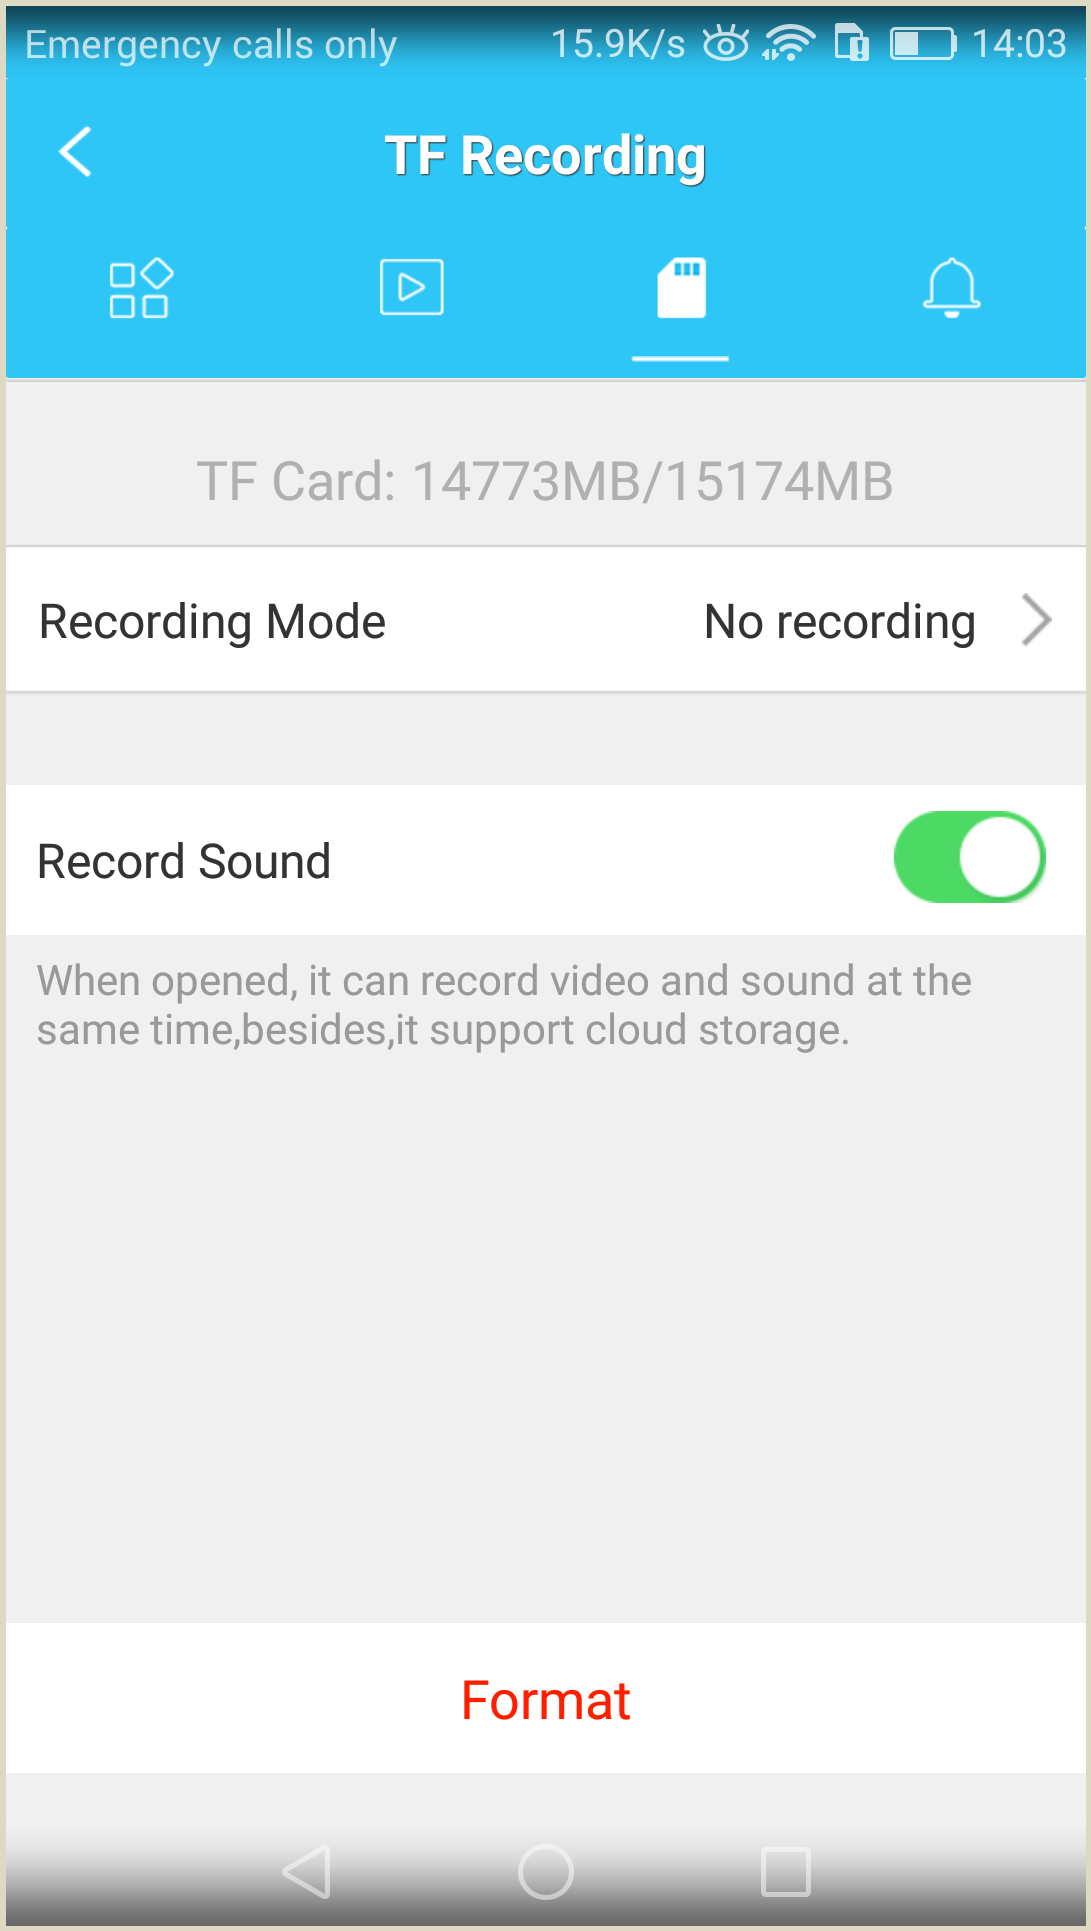
28.How to record sound to SD card?
The function of recording sound to SD card is turned off by default.
You can enable it on phone APP:
Open the APP on your smart phone, go to the home page and find the camera, click the three dots on the right corner of the camera, go to ‘Settings-TF Recording’, to enable the ‘Record Sound’.
29.SD card is not being recognized?
The solutions are as follows:
1.Check whether it is inserted in the opposite direction.
2.After inserted, click “format SD card” (format it even if you cannot check SD card’s memory size), reboot camera and refresh it.
3.Please plug the SD card to a card reader, then plug the card reader to a computer and format it to FAT32 format.
4.Make sure the card is working, you can test it on other camera or devices.
5.If the above steps do not work, please change a SD card,(please use genuine SD card), For example, Kingston SD Card, Class 4 and 10 is preferred.
Notes:
1.If the above methods does not work, you can check the SD card slot on the camera and the SD card. If it proved to be hardware problems, please contact the dealer for replacement.
2.Besides, please make sure the camera’s firmware and the APP is in the latest version. If not, please update to the latest one.
30.How to playback SD card videos on PC client?
To playback the video recorded to SD card on PC client, please open the client, move cursor to the window of the camera, right click on it, choose ‘view SD card files’, in the pop-up window, click on ‘Refresh’, the video files will be listed on the right panel, click the videos to playback them.
31.How to download video clips from SD card?
We can download video clips from SD card on mobile APP Eye4.
To do that, we can open the app Eye4, click the setting icon on the top right corner of the camera, choose ‘TF Card Records’, tap the video clip you want to download, and click the arrow on the right side of the video file, to download it. After being downloaded, on ios phone, the video will be stored to your phone’s album, on android phone, the video will be stored to your phone’s File-DCIM-Eye4 directory.
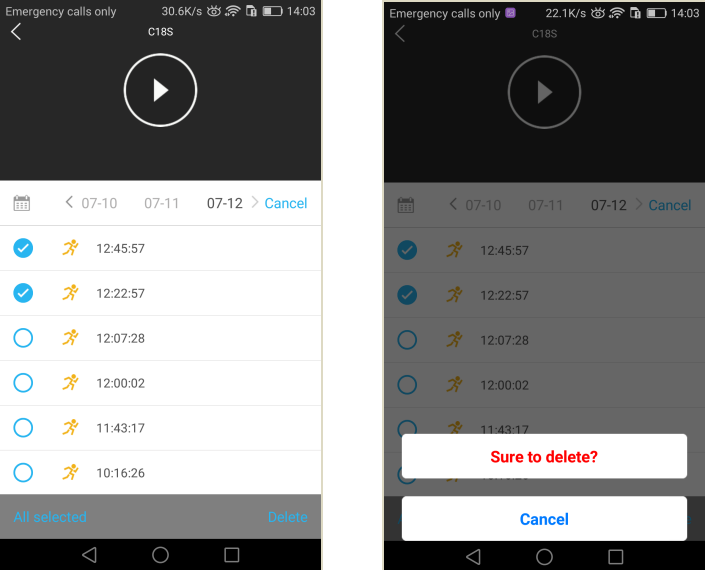
32.How to remove video files from SD card?
SD card video can be deleted by the following 2 methods:
1. Delete the recording files in “TF card Records”
Open the APP home page, click the three dots on the upper right corner of the camera, and select “TF Card Records” to view the recording files in the SD card. Click the calendar icon to select the date; Click the “Edit” button on the right to select the video files you want to delete, tap the “delete” option on the lower right corner, after confirming, the video files can be deleted.
 2. To format the SD card
After format the SD card, you can delete all video files in the SD card at one time. To format the SD card, go to the “Settings – TF Recording” of the camera and click “format”. You can also remove the SD card from the camera, insert it into the card reader, then insert the card reader into the computer, and format it on the computer.
2. To format the SD card
After format the SD card, you can delete all video files in the SD card at one time. To format the SD card, go to the “Settings – TF Recording” of the camera and click “format”. You can also remove the SD card from the camera, insert it into the card reader, then insert the card reader into the computer, and format it on the computer.
33.What is the recommended wireless distance between Camera and Router?
The distance depends on the wireless signal strength of the router.
1.At present, VStarcam IP cameras support 2.4G frequency bandwidth wireless router, don’t support 5G frequency bandwidth.
2. It is recommended to keep the distance within 10 meters.
Note:
If the wireless signal of the router is weak, please connect the camera to the router with a network cable. Otherwise, It will make the camera offline.
34.How to manually setup WiFi connection for the camera?
If you failed to setup the WiFi connection for the camera when wirelessly connect it to the router, then please try the following way to setup the WiFi:
Part One:Get the camera online
Step 1. Wired the camera to the router.
Step 2. Add the camera to the APP by ‘input manually’ way: Tap the “+” in the APP, select the ‘IP camera’ –’input manually’, to scan the QR code of the camera (which can be found on the label stick to the camera), input the camera’s password(default password is 888888, if you have ever changed it, please input the new password), make sure the video feed can be seen after that.
Step 3. Please make sure the SSID is not hidden and no space in the SSID nor the password.
Step 4. Make sure the wifi is 2.4Ghz.
Before setup the WiFi, please call the router support and internet provider, make sure the WiFi is 2.4GHz band, not on 5GHz band. If the WiFi is on 5GHz band, the the VStarcam camera is not able to connect to the WiFi. This is very important.
Part Two:Setup WiFi Connection
Please follow the steps below:
Step 1. Click on the three dots on the top right corner of the camera, go to ‘Settings’.
Step 2. Go to WiFi.
Step 3. In the WiFi settings, choose your home WiFi and input the WiFi password.
Note: Please make sure:
1. There is no special characters or space in the WiFi SSID and WiFi password, and the SSID is not hidden,
2. The length of the password is not more than 31 characters. Make sure the router password you input is correct and accurate, otherwise it cannot connect.
3. Please place the camera within 5 meters of the router. Put the smart phone closer to camera, as close as possible。
Step 4. Pay attention to the prompt and click on ‘confirm’.
Step 5. Unplug the LAN cable from the camera, and wait for the camera to finish the reboot automatically. After about 2 mins, you can check if the camera is working wirelessly.
35.What to do if the Wi-Fi connection failed?
Regarding the issue of Wi-Fi connection fail, please refer to the steps below to troubleshoot:
Generally speaking, most of Wi-Fi connection failure cases are caused by improper settings.
1.Please make sure your Wi-Fi network is in 2.4GHz band, being encrypted and the cam can detect your Wi-Fi SSID.
2.Please make sure the Wi-Fi antenna is well installed and intact.
3. Please make sure your Wi-Fi password was entered correctly, no special characters or blank, no more than 31 digits. Besides, it’s case sensitive, please pay attention to the capital letters and small letters.
4. When setup the cam, make sure your phone is connected to your home Wi-Fi, instead of mobile 4G network.
5. It’s recommended to put the cam within 2 meters away from the router when configuring it.
6. Make sure the APP is in the latest version and the firmware version is the latest one,if not, please upgrade to the latest ones.
7. Please reset the camera to factory default and re-configure it.
8. If the Wi-Fi settings failed,please wired the camera to your router and then setup the Wi-Fi, then once put in the Wi-Fi password and click ‘done’, please unplug ethernet cable, and wait until the camera finish rebooting automatically, otherwise, the Wi-Fi settings will not take effect.
9. Please enter the router’s web interface and double check the encryption of the Wi-Fi(WEP/WPA-PSK/WPA2-PSK,TKIP/AES), then go to the web interface of the camera, and make sure the Wi-Fi encryption is match with it in the router.
10. Please change a router to test; You can also change a network to test, in case of incompatible router or network.
11. Make sure that there is no mac filtering or other policies in the router that deny the access of the camera.
12. If non of the above method work, then the Wi-Fi module of the camera must be faulty.
Note: Cameras that with voice prompt will issue voice of Wi-Fi connection success, outdoor cameras don’t have voice prompt function, so will not prompt you that the Wi-Fi is successfully connected, you may check the result by APP connection status.
36.How to change the password of the camera?
We can change the camera’s password on mobile APP or PC client.
Change password on mobile APP
Open the APP, click on the three dots on the top right corner of the camera, go to ‘Settings→Password’, enter new password and click ‘Submit’, done.
Change password on PC client
Open the PC client, and move the cursor to the little window of the camera, right click on it, choose ‘start’, then click on the little gear icon on the bottom right corner of the window, click ‘Modify Password’, in the pop up window, out in the new password twice, click ‘Set’, done.
37.How to lower the volume of cameras?
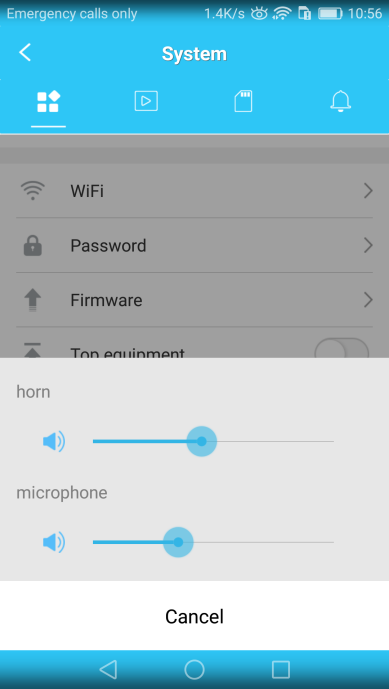
To lower the volume of cameras, please open the APP, click the three dots on the top right corner of the camera, then go to ‘Settings’, scroll down and find out the ‘Device volume’, tap it, there you can see the volume bars of the horn(speaker) and microphone, slide the bar to adjust the volume.
38.How to setup a static ip address and port for the camera?
We can setup static ip address and port number for the camera via IP Camera Finder.
Please follow the steps below:
Step 1. Download the IP Camera Finder to your computer in the webpage below:
https://www.vstarcam.com/software-download
Step 2. Open the finder, and find out the camera in the left side.
Note: The finder can only detect the cameras in the same network with the computer, so please make sure the camera is connecting to the same network with the computer.
Step 3. Highlight the camera, find out the ‘Network’ menu on the right side, click on the blank on it’s right, select the ‘Fixed IP’, then you can edit the ip address, sub mask, gateway and DNS. Please make them in the same segment with your home network.
Note: you can also change port number in this page(change it in the ‘HTTP Port” menu).
After finish the settings, click on ‘Apply’ to save the settings, put in the camera’s username and password. The default username is admin and password is 888888. If you have changed the password, please put in the new password and press ok, then it would work.
39.How to connect your camera to other users?
To connect a camera to other users, please find the UID number and password of the camera, on the other users’ mobile phone, download the APP Eye4 from Google Play or APP Store, register accounts.
After that, open the APP, click the ‘+’ on the top right corner, click ‘Others→IP Camera’, choose “Search in LAN”(only when the other users connect to the same network with the camera) or ‘Manually Add”.
Search in LAN
The APP will detect the camera in the same LAN with the mobile phone, after detected, enter the password of the camera and click ‘Add it’. Other users can view the camera then.
Manually Add
Enter the 15 characters UID number manually or click ‘QR Code Scan’, scan the QR code on the camera’s body, the UID will be auto-fill in, put in the password of the camera and click “OK”, then users can view the camera.
40.How to Upgrade the Camera’s Firmware?
There are two ways for us to upgrade the camera’s firmware, they are as follows:
Please note: The way to downgrade is the same as the upgrade.
Method One: Upgrade the firmware via smart phone APP.
Step 1 Please download the APP-eye4 from our official website:
https://www.vstarcam.com/software-download
Step 2 Add the camera to the APP
Step 3 In the homepage of the APP, click the three dots on the right corner of the camera, choose ‘Settings-Firmware, if there is newer firmware for your camera, then you can tap the ‘upgrade’ arrow directly and it will start to upgrade firmware. Please don’t power off the camera while upgrading, unless it would be bricked.
Method Two. Upgrade it via IP Camera finder.
Step 1. Firstly, please go to the webpage below and download the IP camera finder to your computer: https://www.vstarcam.com/software-download
Step 2. Open “IP camera finder”, it will detect your camera and the camera’s IP address and port will be shown in the lower section of the left side;Highlight the Camera IP.
Step3. Click the ‘Smart upgrade’ tab on the right side of the camera, enter the correct password of the camera and click upgrade, it will upgrade to the latest firmware automatically. Please don’t power off the camera while upgrading, unless it would be bricked.
41. How to upgrade firmware via SD card?
If cameras stopped working after firmware upgrade, we may try to recover it by SD card upgrading.
Please note that not all firmwares can be upgraded by SD card. Generally speaking, firmware that end with 105 and above support upgrading via SD card. If you are not sure if your firmware can be upgraded via SD card, please contact VStarcam support.
Please follow the steps below to upgrade via SD card.
1.Put the .bin file firmware to the SD card( put it directly in the SD card, instead of any folders of the SD card).
2.Power off the camera.
3.Insert the SD card to the camera.
4.Power on the camera.
5.Wait about 2 mins, the camera will upgraded automatically and reboot.
After the camera reboot, you may check if it being covered.
42.IP camera screen blurred , color cast?
If your camera’s screen blurred or it’s color cast, please follow the guide below:
1.Please reboot camera a few times, or restore cameras to factory default settings, after that, it will be back to normal.
2.If the problem occur again and again, then it probably cause by camera’s sensor problem, please contact dealer or salesman for maintenance or replacement.
43.What should I do if the client/APP keep crashing?
Smartphone APP
Please follow the methods below to solve this problem:
1.Uninstall the APP, download and install a new one in google play, apple store or our official website : www.eye4.so/download .
2.If the above method does not work, please make sure there is no anti-virus software on your phone, such as 360 anti-virus. If there is, please add the APP to the white list of the anti-virus software and then try again.
3. If it still does not work, please try on another phone. If APP works good on another phone, that means the problem is caused by the previous phone. If the issue is the same as on the previous phone, then the problem must be caused by the APP. Please contact us for more support.
PC client
Solutions for the issue of PC client quite quickly are as followings:
1.Uninstall the client, download and install a new one, download link: www.eye4.so/download
2.Please do not save it to the default path when install, save it to another disk.
3.Close the anti-virus software on the computer , then try again.
4.If the above solutions cannot help, please contact us online.
44.How to get live stream via RTSP
If you want to stream live video via RTSP, please follow the steps below:
Step one: Confirm basic info required.
The basic info includes Username and Password of the camera, LAN ip address and RTSP port number(the default RTSP port of VStarcam camera is 10554).
How to get the LAN ip address of the camera?
Currently, you can find the camera’s LAN IP via our software IP Camera Finder, which can be downloaded from the link below:
https://www.vstarcam.com/software-download
After you launch the finder, you will find the ip address of the camera on the right side of the finder(make sure the camera is in the same Lan with the computer that installed this finder).
Of course, you can find the IP address by other ways such as logging into your router’s web interface and find the camera’s IP.
Step Two: Stream video in VLC player
Download the VLC player from the internet, launch it, go to Media—Open the network stream—input the RTSP link to the ‘Input the network URL’, the URL should be as rtsp://camera’s username:camera’s password@camera’s lan ip:10554/udp/av0_0 , for example, if your camera’s user/password are: admin/888888 and lan ip is 192.168.1.126, then you can use the following URL to access the camera in VLC player.
rtsp://admin:888888@192.168.1.126:10554/udp/av0_0
Make sure the URL has been correctly input, then click on ‘play’, you will get live video.
Please note that the RTSP works only in LAN, does not work remotely.
45.How to flip the inverted picture?
Click the three dots on the right upper side, click settings, select “Video”,enable “Vertical mirror”.